Props và Event Emitting trong Vue.js.
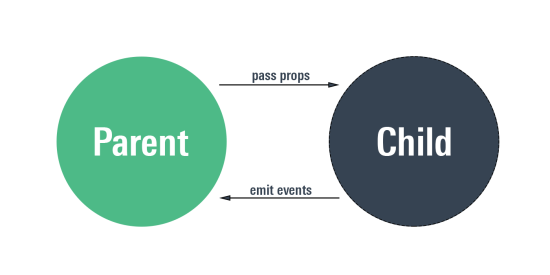
Trong Vue.js, Component có thể giao tiếp với nhau thông qua Props (truyền dữ liệu từ Component cha sang Component con) và Event Emitting (Component con gửi sự kiện lên Component cha).
Mục tiêu bài học:
- Hiểu Props là gì và cách sử dụng để truyền dữ liệu từ Component cha xuống Component con.
- Biết cách sử dụng
$emitđể gửi sự kiện từ Component con lên Component cha. - Thực hành: Xây dựng danh sách sản phẩm với Component con nhận dữ liệu từ Component cha và Component cha xử lý sự kiện khi người dùng mua sản phẩm.
Props và Event Emitting
1. Props – Truyền dữ liệu từ Component cha sang Component con
Props là một cơ chế giúp Component cha truyền dữ liệu xuống Component con.
a) Cách sử dụng Props
- Component cha truyền dữ liệu qua thuộc tính (
:prop-name="value"). - Component con nhận dữ liệu thông qua
props: ["propName"].
Ví dụ: Truyền tên sản phẩm từ cha xuống con
Component cha (App.vue)
const app = Vue.createApp({
  data() {
    return {
      productName: "Laptop Dell XPS 13"
    };
  },
  components: {
    "product-info": ProductInfo
  },
  template: `<product-info :name="productName"></product-info>`
});
Component con (ProductInfo.vue)
const ProductInfo = {
  props: ["name"],
  template: `<h2>Sản phẩm: {{ name }}</h2>`
};
Giải thích: Component cha truyền dữ liệu productName xuống Component con bằng Props.
2. Event Emitting – Gửi sự kiện từ Component con lên Component cha
Khi Component con cần thông báo sự kiện cho Component cha (ví dụ: người dùng nhấn nút “Mua hàng”), ta dùng $emit.
a) Cách sử dụng $emit
- Component con gửi sự kiện bằng
$emit("event-name", data). - Component cha bắt sự kiện bằng
@event-name="handlerMethod".
Ví dụ: Khi người dùng nhấn “Mua hàng”, Component con gửi sự kiện lên Component cha
Component con (ProductInfo.vue)
const ProductInfo = {
  props: ["name"],
  template: `
    <div>
      <h2>Sản phẩm: {{ name }}</h2>
      <button @click="buyProduct">Mua hàng</button>
    </div>
  `,
  methods: {
    buyProduct() {
      this.$emit("buy", this.name); // Gửi sự kiện lên Component cha
    }
  }
};
Component cha (App.vue)
const app = Vue.createApp({
  data() {
    return {
      productName: "Laptop Dell XPS 13"
    };
  },
  methods: {
    handlePurchase(product) {
      alert(`Bạn đã mua sản phẩm: ${product}`);
    }
  },
  components: {
    "product-info": ProductInfo
  },
  template: `<product-info :name="productName" @buy="handlePurchase"></product-info>`
});
Giải thích: Khi người dùng nhấn Mua hàng, Component con dùng $emit("buy", this.name) để gửi sự kiện lên Component cha. Component cha bắt sự kiện này bằng @buy="handlePurchase".
Thực hành: Xây dựng danh sách sản phẩm với Component con nhận dữ liệu từ Component cha
Yêu cầu:
- Tạo một Component
ProductItem.vuehiển thị thông tin sản phẩm (tên, giá). - Component cha truyền danh sách sản phẩm xuống Component con qua Props.
- Khi người dùng nhấn “Mua hàng”, Component con gửi sự kiện lên Component cha bằng
$emit.
Bước 1: Cấu trúc thư mục
/project
  /index.html
  /main.js
  /ProductItem.vue
Bước 2: Tạo file index.html
<!DOCTYPE html>
<html lang="vi">
<head>
    <meta charset="UTF-8">
    <meta name="viewport" content="width=device-width, initial-scale=1.0">
    <title>Danh sách sản phẩm</title>
</head>
<body>
    <div id="app"></div>
    <script type="module" src="main.js"></script>
</body>
</html>
Bước 3: Tạo file ProductItem.vue (Component con)
const ProductItem = {
  props: ["product"],
  template: `
    <div class="product-card">
      <h2>{{ product.name }}</h2>
      <p>Giá: {{ product.price }} VNĐ</p>
      <button @click="buyProduct">Mua hàng</button>
    </div>
  `,
  methods: {
    buyProduct() {
      this.$emit("purchase", this.product.name);
    }
  }
};
Bước 4: Tạo file main.js (Component cha)
import { createApp } from "vue";
import ProductItem from "./ProductItem.vue";

const app = createApp({
  components: {
    "product-item": ProductItem
  },
  data() {
    return {
      products: [
        { name: "Laptop Dell XPS 13", price: 30000000 },
        { name: "MacBook Pro 14", price: 40000000 },
        { name: "Asus ROG Strix", price: 35000000 }
      ]
    };
  },
  methods: {
    handlePurchase(productName) {
      alert(`Bạn đã mua: ${productName}`);
    }
  },
  template: `
    <div>
      <h1>Danh sách sản phẩm</h1>
      <product-item
        v-for="(product, index) in products"
        :key="index"
        :product="product"
        @purchase="handlePurchase"
      ></product-item>
    </div>
  `
});

app.mount("#app");
Kết quả:
- Danh sách sản phẩm được hiển thị từ Component cha.
- Khi người dùng nhấn “Mua hàng”, Component con gửi sự kiện lên cha.
- Component cha bắt sự kiện và hiển thị thông báo mua hàng.
Kết luận
Tóm tắt kiến thức quan trọng:
- Props giúp truyền dữ liệu từ Component cha xuống Component con.
-
Event Emitting (
$emit) giúp Component con gửi sự kiện lên Component cha. - Thực hành: Xây dựng danh sách sản phẩm, xử lý sự kiện mua hàng.
Với hơn 10 năm kinh nghiệm lập trình web và từng làm việc với nhiều framework, ngôn ngữ như PHP, JavaScript, React, jQuery, CSS, HTML, CakePHP, Laravel..., tôi hy vọng những kiến thức được chia sẻ tại đây sẽ hữu ích và thiết thực cho các bạn.
Xem thêm
Chào, tôi là Vũ. Đây là blog hướng dẫn lập trình của tôi.
Liên hệ công việc qua email dưới đây.
lhvuctu@gmail.com